

Wooden surfaces add warmth and elegance to any space, be it furniture, floors, or countertops. Over time, however, these surfaces can accumulate dirt, grime, and lose their luster. Cleaning and polishing wooden surfaces may seem like a daunting task, but with the right approach, you can revive their natural beauty and make them look like new. In this blog post, we’ll guide you through an effective method to clean and polish your wooden surfaces in one action, restoring their shine and leaving them looking refreshed.
Step 1: Gather the Necessary Supplies:
Before getting started, gather the following supplies:
– Microfiber cloth or soft lint-free cloth
– Mild wood cleaner or a homemade solution (such as a mixture of vinegar and water)
– High-quality wood polish or furniture oil
– Protective gloves (optional)
Step 2: Dusting and Preparing the Surface:
Begin by removing any loose dust or debris from the wooden surface. Use a dry microfiber cloth or a soft lint-free cloth to gently wipe away the dirt. This step is important to prevent scratching the surface during the cleaning process.
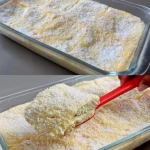
Step 3: Cleaning the Wooden Surface:
Next, prepare the cleaning solution. If using a commercial wood cleaner, follow the instructions on the packaging. Alternatively, you can create a homemade solution by mixing equal parts of vinegar and water. Dampen a clean cloth with the solution, ensuring it is not soaking wet. Proceed to wipe the wooden surface, moving in the direction of the grain. Be cautious not to oversaturate the wood, as excessive moisture can cause damage.
Step 4: Polishing and Restoring the Shine:
After cleaning the wooden surface, it’s time to restore its shine and protect it from future wear. Apply a small amount of high-quality wood polish or furniture oil onto a clean, dry cloth. Gently rub the polish onto the surface, again following the direction of the grain. Take care to cover the entire surface evenly, applying a thin layer of the polish. Allow the polish to penetrate and dry according to the product instructions.
To achieve a sparkling finish, use a fresh microfiber cloth or a soft lint-free cloth to buff the wooden surface. Using circular motions, gently rub the cloth over the surface, applying slight pressure. This buffing action helps to remove any excess polish and brings out the natural shine of the wood. Continue buffing until the surface feels smooth and has a lustrous appearance.
Step 6: Finishing Touches and Maintenance:
Once you’ve achieved the desired shine, take a moment to admire the like-new finish of your wooden surface. To maintain its beauty, use coasters or placemats to protect the surface from spills and heat. Regularly dust and wipe the surface with a dry or slightly damp cloth to prevent the accumulation of dirt or grime. Periodically reapply wood polish or furniture oil to keep the surface nourished and protected.
Cleaning and polishing wooden surfaces in one action can transform dull and worn-out surfaces into stunning features in your home. By following the steps outlined in this blog post, you can effectively clean away dirt, restore the natural shine, and protect your wooden surfaces. Remember to use the appropriate cleaning solutions and high-quality wood polish or furniture oil for optimal results. With proper care and maintenance, your wooden surfaces will continue to exude timeless beauty and elegance for years to come.


